Showing posts with label father's day. Show all posts

Wednesday, June 4, 2014

Father's Day Cookie Tie Tutorial!

Have you started thinking about Father's Day yet?
(it's okay-I haven't either)

But, I received a couple of emails this week from readers who HAD started planning.  
They were looking for the tutorial for my giant cookie tie.
It wasn't until I went to grab the link for them that I realized I never published it here!
(the tutorial first appeared at SheKnows.com)


You will need:

Tie-shaped gift box
Royal Icing in both Flood and Piping consistencies
Food Coloring
Pastry bags and/or squeeze bottles and decorating tips
1 1/4 inch strip of card stock


Let's cut out the cookies!

Print your template.


Cut out shapes and tape the two pieces together.

Check the size of the necktie template against the size of your tie box.


Perfect fit!


Place your chilled and rolled cookie dough onto either parchment paper or a silicone liner, 
and then onto your cookie sheet.

Position your template on your dough
Using a thin knife, trim around your template, cutting out your tie.


Remove the excess cookie dough....


...and you have a giant tie cookie ready for the oven!

If you have room, move your template over and cut out a second necktie. 
(Always make an extra if you can, no need to tempt fate.)

Just make sure to leave enough space between your cookies so that they don't bake into each other.
You can use a long spatula to gently space them apart.  

If they are too soft to move, pop your cookie sheet in the fridge for 10 minutes or so and try again.


Bake your cookies at the the recommended temp for your dough.
(Mine is 375)

I started checking these at 8 minutes, but I ended up baking them for 91/2.
You just want the edges to start to get a bit of color.


Prepare your icing in your Dad's favorite colors!

I used:
Dark blue: 10 second flood and piping icing — 
Mixed with navy blue, a little violet and a drop of black.

Light blue: 10 second flood and piping icing — 
Mixed with a small a drop of royal blue.


Orange: 10 second flood icing — Mixed with equal parts orange and electric orange.

White: 10 second flood icing


I like squeeze bottles for my flood icing, so I used those with #3 tips.
Piping icing went into pastry bags fitted with a #2 tip.


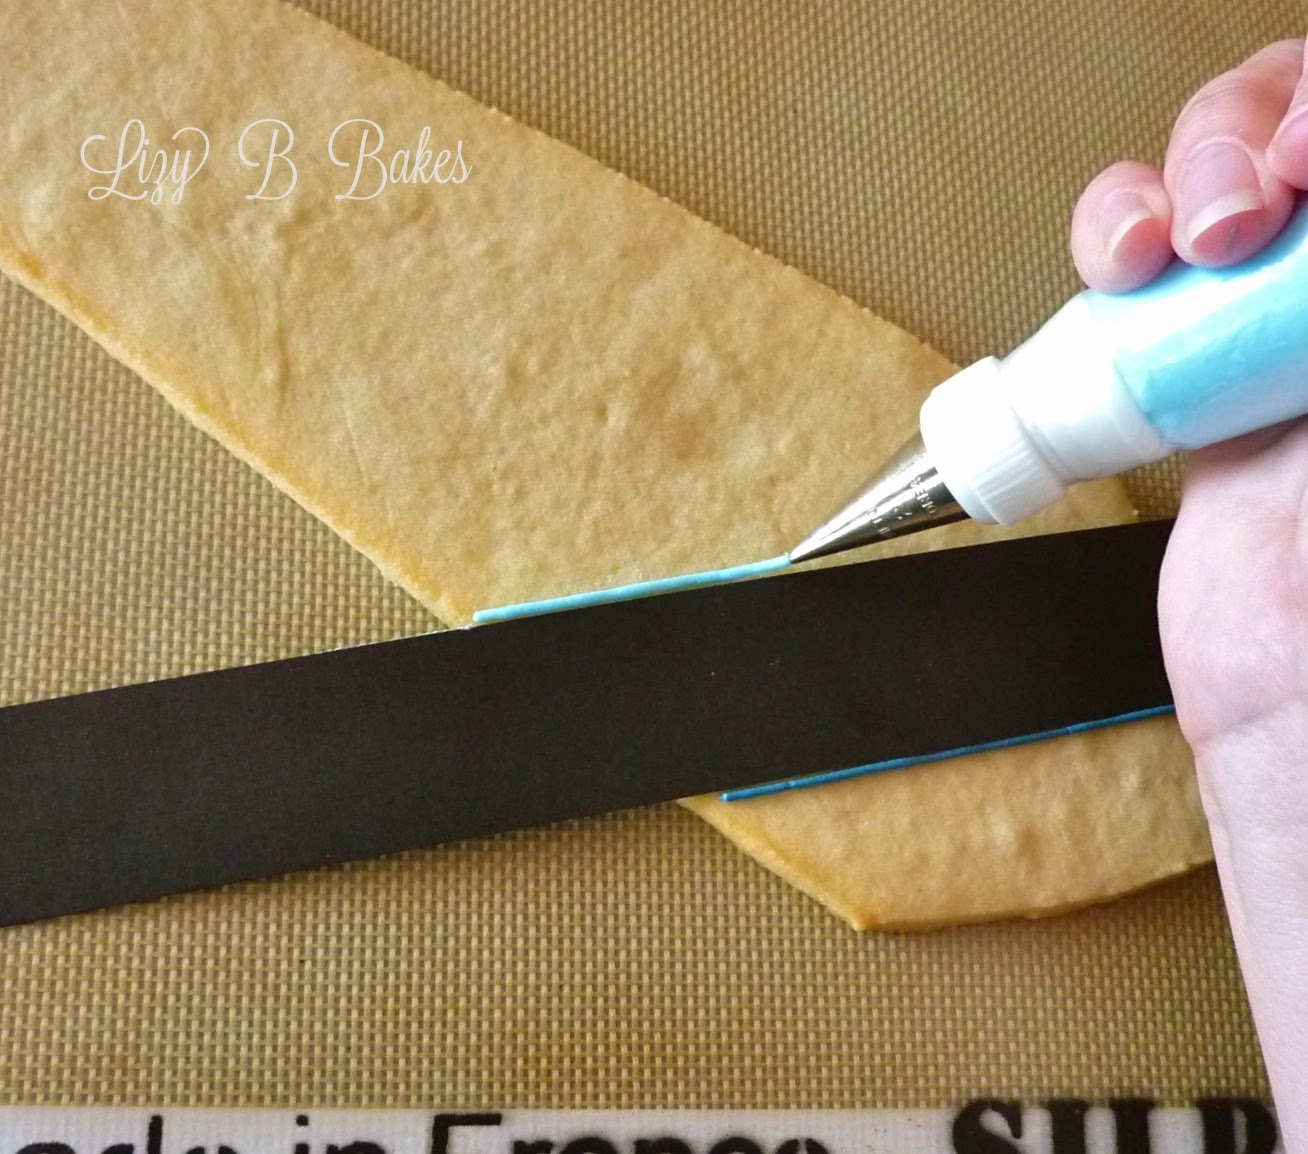
Take your strip of card stock and place it diagonally about an inch from the bottom of your tie.
Try to make the slant parallel with the diagonal edge of the tie.

Pipe a dark blue line underneath the bottom of the strip,
and a light blue line along the top.


Now pick up your card stock and place it directly above the line you just made.
Pipe a line above your strip in dark blue.

Using the card stock will ensure that your diagonal lines are both evenly spaced and straight!

Continue this all the way up your tie, alternating colors, until you reach the knot.


When you get to the top, draw a horizontal line across the bottom of the knot,
Make sure you draw the stripe on the knot in the opposite direction!

Connect your stripes along the outer edges with alternating colors.

Let these outlines dry approx. 30 minutes before you flood your cookie.


Time to color it in!

Start by flooding your first diagonal section. 
(I'm using a squeeze bottle with a #3 tip)


Flood until almost full, using tip to push icing into corners.
Immediately pipe a straight line across the section with orange flood icing.


This is called a "wet-on-wet" technique. 
The orange will settle evenly with the dark blue and leave a smooth surface. 

(y'know... like a necktie)

Fill all the dark sections and let set approximately 30 minutes.
Continue this same technique with remaining sections using light blue and white icing.


Let your tie cookie dry overnight! 
No touching!!
The next day your icing will be dry and touchable.

Love is in the details


The final touches always make your cookie extra-special.
With your dark blue piping icing and a #2 tip, 
pipe lines where your sections meet, skipping the knot at the top.


For the knot, use your light blue icing and a #2 tip. 
Pipe a horizontal line where the knot meets the body of the tie.


Finally, outline the edge of your necktie cookie, alternating colors so they match the stripe.
Let dry a few hours, overnight if you can.


Wrap up your Father's Day cookie!

It's really all about the presentation...


The possibilities are endless when it comes to decorating this cookie.

I would love to see one covered in sprinkles!!!


I hope this gets you thinking about ways to spoil the dads in your life!


Happy Father's Day!


Thanks for stopping by! Lizy B
Pin It

Monday, June 11, 2012

Cookie Necktie for Father's Day!

I recently had an opportunity to write a featured post for the website


They asked me to create a special Father's Day Cookie and tutorial for their readers....


It needed to be something I hadn't made before.....


but definitely something that just screamed 


"FATHER'S DAY!!!!!"

what to do....what to do....?


Oh!!  I know!!!


All Dads love ties, right!?!?


Head over there for a FULL tutorial with TONS of Pictures!!!!

You can make your very own GIANT SUGAR COOKIE TIE for Father's day!!

CLICK HERE!!!


What do you have planned for Father's Day?


Thanks for stopping by,

Lizy B

Thursday, May 17, 2012

Tutorial - Sugar Cookie Scrabble Board - Part 2

Let's finish this up!

(Part One of the tutorial can be found HERE)


Want to guess just how much royal icing it takes to cover a 12 inch cookie?


Anyone?


I used 16 ounces of grey flood consistency icing.
Really, I could have used a bit more...20 ounces would be perfect.


Next time, I'll be mixing, and then pouring from a measuring cup.

Lesson learned.


By the time the icing was poured, it had already started to set up in some spots.
(Which means there wasn't much I could do to smooth it out)


I put it under the fan for many, many hours and then....


It looked like a really unattractive grey cement paver for the backyard.

There aren't any pictures of the plain slab because.....it was ugly.


Next step, The Grid!


The playing grid is 15 squares across and 15 squares high.

If you divide it up evenly, with some left over for a border, 
then each square needs to be about 3/4 of an inch.


Since I had invested in a Kopykake, I thought I should try to use it.


I used the projected lines to make sure the ruler was straight,
and then piped a line along side of it.

But the lines were a bit distorted,
and clearly the image is not big enough,
and.....it wasn't going to happen.


This was a HORRIBLE idea.


I'm embarrassed to say that I even thought it might work.
(just keeping it real...)


So I went the low-tech route.


I used a long strip of card stock as a template.  

It's a little bit more narrow than I needed the squares to be
to allow for the width of the piped line.
(#2 tip)


I laid it next to the existing line, piped right above it, 
then moved the template up, and just kept going!


After the lines dried for about an hour,
I went the other direction.

Well now that wasn't so bad after all!


A border around the edges was the last step before letting it dry overnight.


The squares are painted with food coloring and a bit of water.


When it was all finished and dry, I measured the squares again to
determine the size of the letter tiles.


Half inch tiles turned out to be perfect!

Can you tell I painted them first?


I iced them the next day after Ethan asked me why the squares were the color of Cheetos.

...ahem...


There they are!!!


Quick!
Can you find the one that doesn't belong?


Ready...set...go!

(one mississippi, two mississippi, three mississippi....)


Did you find it?


No, there isn't really a heart in Scrabble or Words With Friends.

But there should be!!!

(Letters are piped with a 1.5 PME, numbers are written with edible marker)


Note of caution...

if you really do want to play with the board,

make sure the kids don't eat the letters first.


43 Points!!!


Thanks for stopping by,

Lizy B


Tuesday, May 15, 2012

Tutorial - Sugar Cookie Scrabble Board - Part 1

You may or may not have seen the 

Words With Friends/Scrabble Board Cookie that I made for Mother's Day.

Just in case you missed it.....


Most everyone wanted to know how big it was.

Well, it was huge.

Huge, at least, for a sugar cookie.
The board is 12 inches square, each little letter tile is 1/2 inch.

The challenge was how to make sure it was exactly the right size, 
exactly square and, most importantly, 
cooked all the way through.

If I baked it in one piece, 
I was afraid the edges would be hard as rock before the middle was even set.

After all, it's still a cookie.  

It needs it to taste good!


So I channeled my inner HDTV home improvement host and thought,

"What if I make tiles...then ice them all together... like one big cookie?"

That might work....


So I baked nine 4 inch squares, 
then trimmed them immediately after taking them out of the oven.
(yes, I totally burnt my fingers)

They didn't spread too much, but the edges were definitely bowed.


All trimmed, they fit together perfectly!
(that's a 10 x 13 cake board)


Time for the grout!!!

I put a little bit of icing under each cookie to hold it down,


and a few drops at the seams,


then filled in any gaps!

So far, so good.


This is when I started to get a little scared.

Just how much icing does it take to flood a cookie this size?


It takes so much that you begin to laugh hysterically at yourself because you
actually took the time to fill squeeze bottles with icing!

Duh!

Pour it on!!

Quick!

It's starting to set!!!!!


AAAAAHHHHHH!!!!!!


Thanks for stopping by,

Lizy B
Related Posts Plugin for WordPress, Blogger...