Tuesday, May 29, 2012

Baseball Player Cookies!

Jack has officially finished his first season of Little League!


Although all the kids are sad there won't be any more games or practices until next year,

there's still one more event to look forward to.....


Would you like to meet our team?


You would?

(I knew it, you guys are just the best)


I would like to introduce the 

LFLL 2012 Colorado Rockies
Teeball Division!


#1 Max!!  #2 Lydo!!  #3 Ryan!!  

#4 Carter!!  #5 Bryce!!  #6 Flynn!!


#7 Kyle!  #8 Philip!!  #9 Christopher!!

#10 Joseph!!  #11 Nathaniel!!  #13 Jack!!


My husband was their fearless leader.

By the end of the season they were catching balls, 
making outs and even running the right direction around the bases!!

(that's not always easy...especially for the lefties!)


 Sorry....had to.

There's just nothing cuter than a munchkin in catcher's gear.....


I made something extra special for the Team Mom....

but I can't show you yet!

The party isn't until tomorrow!


Thanks for stopping by,

Lizy B


Sunday, May 27, 2012

Memorial Day Cookies!


Memorial Day Cookies


Sending Gratitude and and Admiration 
to all those who gave their lives in protection of others.


Wishing Peace for their loved ones who are remembering them today.


Thanks for stopping by,

Lizy B


These cookies were originally posted HERE


Wednesday, May 23, 2012

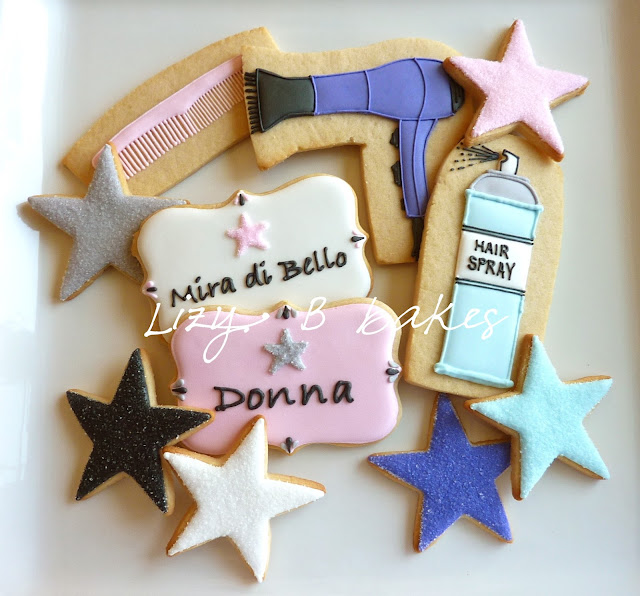
Beauty School Graduate!

...ahem..

(please sing the following post to the tune of 
Beauty School Dropout 
from the ever fabulous musical Grease....
thank you, thank you very much)


Beauty School Graduate

Beauty school graduate,
Its graduation day for you.
Beauty school graduate,
Passed your midterms and aced shampoo!

Well you even went and took the time to wash and clean your clothes up,
After spending all that dough to learn just how to put your hair up!


Baby get moving (baby get movin'),
Let's keep your dreams and hopes alive!
What are you proving (what are you provin'),
You've got the dream and you've got the drive!

You went for your diploma, no need for the steno pool.
Pick up your teasin' comb, you're all done with this school!

Beauty school graduate (beauty school graduate),
Hanging around the corner chair.
Beauty school graduate (beauty school graduate),
It's about time you cut some hair!


Well they went and taught you everything,
And you know you're such a looker,
All these customers have come for you,
its time you had a booker!

Baby don't sweat it (don't sweat it),
You are so perfect for this job.
Better forget it (forget it),
She wants her hair cut in a bob!


Now your bangs are curled, 
your lashes whirled,
and still the world is new.
Pick up your angel face and get out of this school!

Baby don't blow it,
Don't put my good advice to shame.
Baby you know it,
Eben Dear Abby'd say the same!


Now I've called the shot, get off the block, I really gotta fly!
Gotta be going to that malt shop in the sky!

Beauty school graduate (beauty school graduate),
All done with that school.
Beauty school graduate (beauty school graduate),
All done with that school.
Beauty school graduate (beauty school graduate),
All done with that school.


Congratulations Donna!

Now, Sandy needs a blow out.
Can you fit her in?


Thanks for stopping by,

Lizy B


Sunday, May 20, 2012

Sunflower Cookies! A Perfect Petal Tutorial!

Summer's coming!!


We've finally had some sunny mornings here in Southern California.
I made these sunflowers a few weeks ago when we were still covered in a haze of fog.

In other words...yes, the pictures are a bit dark and bluish.
(Photo editing can only do so much.)

But, now that I've ordered a light box 
we're assured sunny weather from now 'til eternity,
so that will be good.


I thought I'd use these sunflowers 
to show you how I get the blank spaces between the petals.


Sometimes, I like a little bit of cookie to show through all that icing.

For the longest time, I just piped my petals and hoped for the best.
But every third or forth cookie I'd get a few wonky petals 
and have to scrape them off and start over.

In the interest of efficiency, 
(and not losing my mind)
I came up with a way to make sure I only had to decorate each cookie once.

Here goes....


Start with a symmetrical flower, as many petals as you'd like.


Decide how large you'd like the center of your flower to be,
 and grab a circle cutter the same size.

Being careful to center the cutter, press down gently to create an imprint.


With an edible ink marker, 
make a dot on the inside on the circle,
 directly across from the point where two petals meet.

Make sure the mark is on the inside of the circle so that it is covered when the center is flooded.

Keep going all the way around.


Next, pipe a line (I used a #3 tip) the same color as your flower center,
over the imprint, covering it completely.


Finally, when you pipe your petals (#3 tip again), 
start and stop on either side of the marks that you made.

Easy-peasy!


Perfectly spaced petals!

I finished these up by flooding the petals and letting them dry.

Then flooding the center with black, and immediately adding wet-on-wet white polka dots.


The bead trim was the last step, added after everything was completely set.

I don't like lonely flowers so I made them some little friendly bees.


This little 'side-view' bee is a new cutter for me.
Not quite sure how I feel about him yet.

I think I'd like him better if I cut off the stinger before I bake him next time.

Just too aggressive...

I couldn't bring myself to ice it on.


These flew out the door to some very lovely ladies!

Bzzzzzzzzz......


Thanks for stopping by,

Lizy B

Thursday, May 17, 2012

Tutorial - Sugar Cookie Scrabble Board - Part 2

Let's finish this up!

(Part One of the tutorial can be found HERE)


Want to guess just how much royal icing it takes to cover a 12 inch cookie?


Anyone?


I used 16 ounces of grey flood consistency icing.
Really, I could have used a bit more...20 ounces would be perfect.


Next time, I'll be mixing, and then pouring from a measuring cup.

Lesson learned.


By the time the icing was poured, it had already started to set up in some spots.
(Which means there wasn't much I could do to smooth it out)


I put it under the fan for many, many hours and then....


It looked like a really unattractive grey cement paver for the backyard.

There aren't any pictures of the plain slab because.....it was ugly.


Next step, The Grid!


The playing grid is 15 squares across and 15 squares high.

If you divide it up evenly, with some left over for a border, 
then each square needs to be about 3/4 of an inch.


Since I had invested in a Kopykake, I thought I should try to use it.


I used the projected lines to make sure the ruler was straight,
and then piped a line along side of it.

But the lines were a bit distorted,
and clearly the image is not big enough,
and.....it wasn't going to happen.


This was a HORRIBLE idea.


I'm embarrassed to say that I even thought it might work.
(just keeping it real...)


So I went the low-tech route.


I used a long strip of card stock as a template.  

It's a little bit more narrow than I needed the squares to be
to allow for the width of the piped line.
(#2 tip)


I laid it next to the existing line, piped right above it, 
then moved the template up, and just kept going!


After the lines dried for about an hour,
I went the other direction.

Well now that wasn't so bad after all!


A border around the edges was the last step before letting it dry overnight.


The squares are painted with food coloring and a bit of water.


When it was all finished and dry, I measured the squares again to
determine the size of the letter tiles.


Half inch tiles turned out to be perfect!

Can you tell I painted them first?


I iced them the next day after Ethan asked me why the squares were the color of Cheetos.

...ahem...


There they are!!!


Quick!
Can you find the one that doesn't belong?


Ready...set...go!

(one mississippi, two mississippi, three mississippi....)


Did you find it?


No, there isn't really a heart in Scrabble or Words With Friends.

But there should be!!!

(Letters are piped with a 1.5 PME, numbers are written with edible marker)


Note of caution...

if you really do want to play with the board,

make sure the kids don't eat the letters first.


43 Points!!!


Thanks for stopping by,

Lizy B


Tuesday, May 15, 2012

Tutorial - Sugar Cookie Scrabble Board - Part 1

You may or may not have seen the 

Words With Friends/Scrabble Board Cookie that I made for Mother's Day.

Just in case you missed it.....


Most everyone wanted to know how big it was.

Well, it was huge.

Huge, at least, for a sugar cookie.
The board is 12 inches square, each little letter tile is 1/2 inch.

The challenge was how to make sure it was exactly the right size, 
exactly square and, most importantly, 
cooked all the way through.

If I baked it in one piece, 
I was afraid the edges would be hard as rock before the middle was even set.

After all, it's still a cookie.  

It needs it to taste good!


So I channeled my inner HDTV home improvement host and thought,

"What if I make tiles...then ice them all together... like one big cookie?"

That might work....


So I baked nine 4 inch squares, 
then trimmed them immediately after taking them out of the oven.
(yes, I totally burnt my fingers)

They didn't spread too much, but the edges were definitely bowed.


All trimmed, they fit together perfectly!
(that's a 10 x 13 cake board)


Time for the grout!!!

I put a little bit of icing under each cookie to hold it down,


and a few drops at the seams,


then filled in any gaps!

So far, so good.


This is when I started to get a little scared.

Just how much icing does it take to flood a cookie this size?


It takes so much that you begin to laugh hysterically at yourself because you
actually took the time to fill squeeze bottles with icing!

Duh!

Pour it on!!

Quick!

It's starting to set!!!!!


AAAAAHHHHHH!!!!!!


Thanks for stopping by,

Lizy B

Sunday, May 13, 2012

Words with Friends....Cookie Style!

Some new and lovely friends of mine introduced me to 

Words with Friends!


So when Mr. Friend asked me to make cookies for Mrs. Friend for Mother's Day,

(using the words with friends chat feature)

I knew just what to make!!!


Hi Mrs. Friend!!!!

Your husband and munchkins think you are wonderful and 

wish you the best Mother's Day ever!!!


Yup, that's a full size, edible, sugar cookie game board 

and a full set of letter tiles to play with.

I'm thinking whomever wins the game gets to eat the heart cookies.


...and since Mr. Friend is a very smart man, 

I'm sure his lovely wife will be winning this game.


For all you cookie friends out there....


...full tutorial coming this week!


Thanks for stopping by,

Lizy B


Saturday, May 12, 2012

Moms Are Great!

I'd like to wish everyone a Happy Mother's Day!


Not only the moms,


but grandmothers, aunts, great aunts and step-moms too.


I'm sure there are more than one or two dads out there 

that are both mom and dad to their munchkins.


They deserve an extra big hug tomorrow as well,

don't you think?


I hope you all get to spend the day with people you love,

 doing something that makes you smile!


Thanks for stopping by,

Lizy B


Related Posts Plugin for WordPress, Blogger...