You will need:
Tie-shaped gift box
Royal Icing in both Flood and Piping consistencies
Food Coloring
Pastry bags and/or squeeze bottles and decorating tips
1 1/4 inch strip of card stock
Let's cut out the cookies!
Print your template.

Cut out shapes and tape the two pieces together.
Check the size of the necktie template against the size of your tie box.

Perfect fit!
Place your chilled and rolled cookie dough onto either parchment paper or a silicone liner,
and then onto your cookie sheet.
Position your template on your dough
Using a thin knife, trim around your template, cutting out your tie.

Remove the excess cookie dough....

...and you have a giant tie cookie ready for the oven!
If you have room, move your template over and cut out a second necktie.
(Always make an extra if you can, no need to tempt fate.)
Just make sure to leave enough space between your cookies so that they don't bake into each other.
You can use a long spatula to gently space them apart.
If they are too soft to move, pop your cookie sheet in the fridge for 10 minutes or so and try again.

Bake your cookies at the the recommended temp for your dough.
(Mine is 375)
I started checking these at 8 minutes, but I ended up baking them for 91/2.
You just want the edges to start to get a bit of color.
Prepare your icing in your Dad's favorite colors!
I used:
Dark blue: 10 second flood and piping icing —
Mixed with navy blue, a little violet and a drop of black.
Light blue: 10 second flood and piping icing —
Mixed with a small a drop of royal blue.

Orange: 10 second flood icing — Mixed with equal parts orange and electric orange.
White: 10 second flood icing

I like squeeze bottles for my flood icing, so I used those with #3 tips.
Piping icing went into pastry bags fitted with a #2 tip.

Take your strip of card stock and place it diagonally about an inch from the bottom of your tie.
Try to make the slant parallel with the diagonal edge of the tie.
Pipe a dark blue line underneath the bottom of the strip,
and a light blue line along the top.
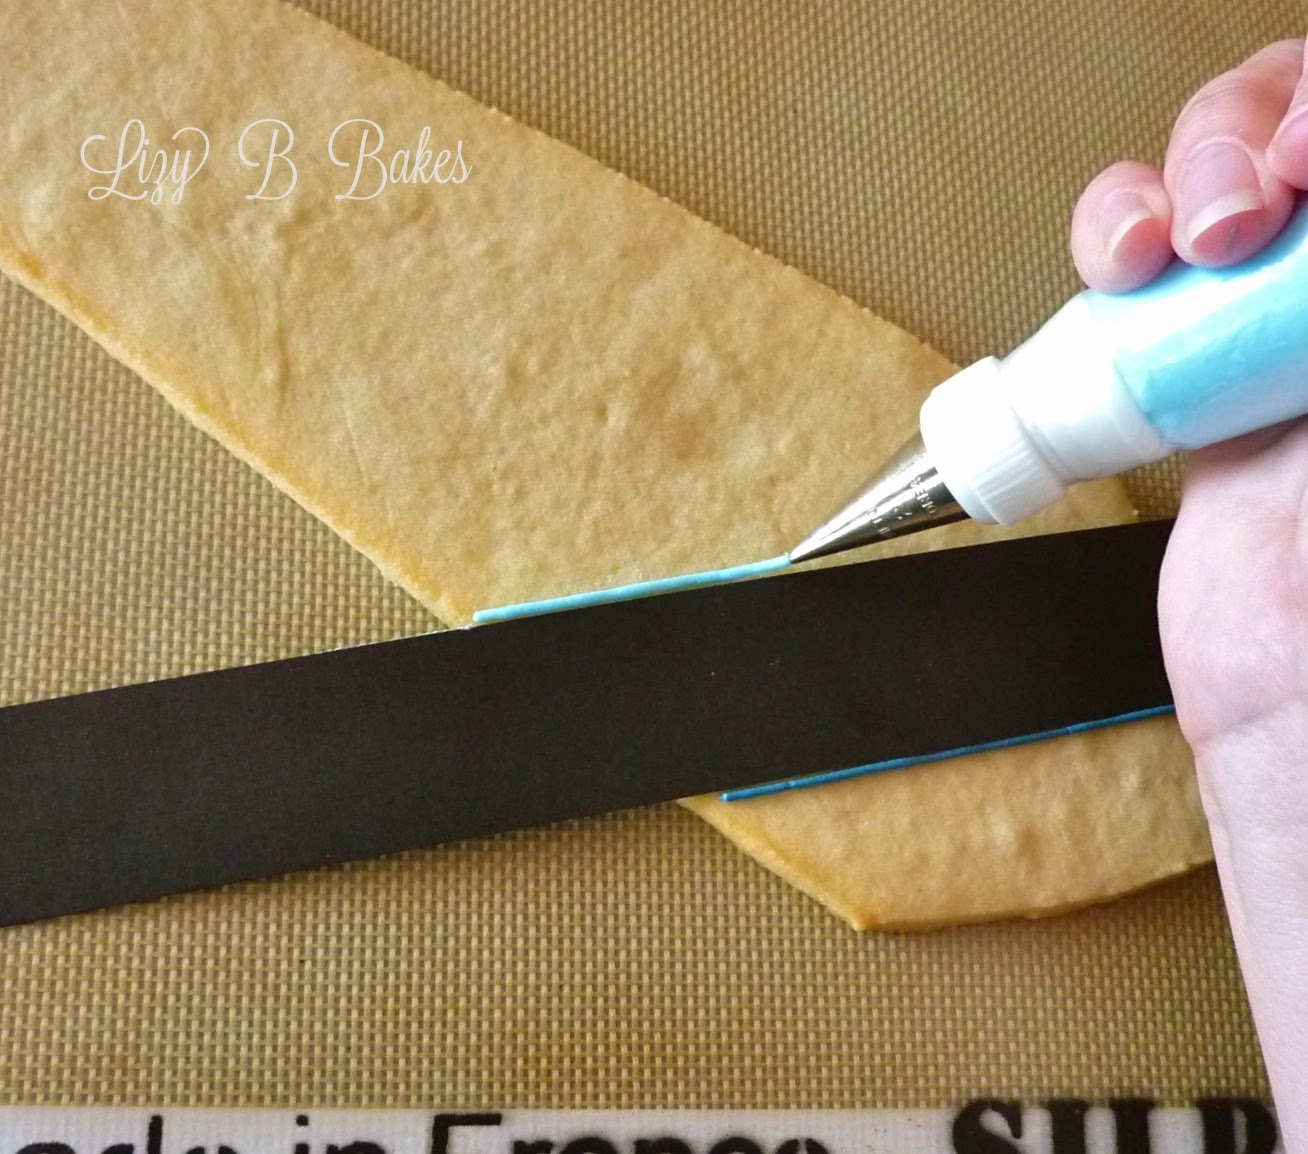
Now pick up your card stock and place it directly above the line you just made.
Pipe a line above your strip in dark blue.
Using the card stock will ensure that your diagonal lines are both evenly spaced and straight!
Continue this all the way up your tie, alternating colors, until you reach the knot.

When you get to the top, draw a horizontal line across the bottom of the knot,
Make sure you draw the stripe on the knot in the opposite direction!
Connect your stripes along the outer edges with alternating colors.
Let these outlines dry approx. 30 minutes before you flood your cookie.
Time to color it in!
Start by flooding your first diagonal section.
(I'm using a squeeze bottle with a #3 tip)

Flood until almost full, using tip to push icing into corners.
Immediately pipe a straight line across the section with orange flood icing.

This is called a "wet-on-wet" technique.
The orange will settle evenly with the dark blue and leave a smooth surface.
(y'know... like a necktie)
Fill all the dark sections and let set approximately 30 minutes.
Continue this same technique with remaining sections using light blue and white icing.

Let your tie cookie dry overnight!
No touching!!
The next day your icing will be dry and touchable.
Love is in the details
The final touches always make your cookie extra-special.
With your dark blue piping icing and a #2 tip,
pipe lines where your sections meet, skipping the knot at the top.

For the knot, use your light blue icing and a #2 tip.
Pipe a horizontal line where the knot meets the body of the tie.

Finally, outline the edge of your necktie cookie, alternating colors so they match the stripe.
Let dry a few hours, overnight if you can.
Wrap up your Father's Day cookie!
It's really all about the presentation...

The possibilities are endless when it comes to decorating this cookie.
I would love to see one covered in sprinkles!!!

I hope this gets you thinking about ways to spoil the dads in your life!

Happy Father's Day!