Showing posts with label cookie pops. Show all posts

Tuesday, November 26, 2013

Snowflake Cookies for a Frozen Movie Party!

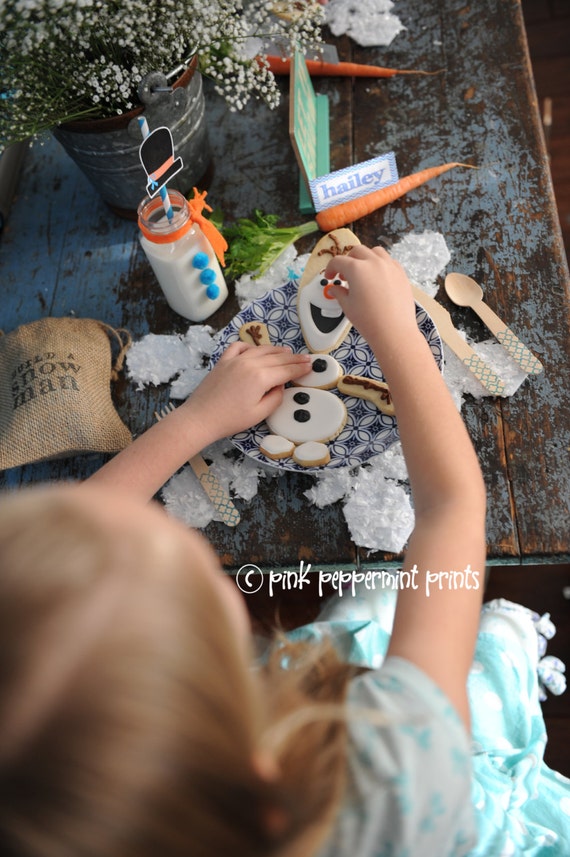
So Olaf made an appearance the other day and introduced himself,
but he wasn't the only cookie I made for the Frozen Movie.
(he was just the most mischievious)

Tammy from Pink Peppermint Designs emailed me when she started planning her Frozen Movie Party and I couldn't wait to play along!

She asked for little 'build-your-own-snowman' sets for the kids to play with and take home.


I love the little bag she put Olaf and his parts in!


Tammy also asked for some sparkly snowflakes in navy and turquoise to match her background....


I love snowflake cookies....and snowflake cookie pops are even better!


Olaf!!!

Oh my word.


Never knew a snowman who liked having his picture taken quite so much.....

Tammy created beautiful printables for this party...
snowman hats for straws, invitations,place cards, labels, banners....

you can find them all in her shop!


Thanks Tammy for inviting me to play along with your girls!!

I hope they had fun!


Whew!

I finally got the little guy in a box!

Have a great Thanksgiving everyone!!!


Thanks for stopping by! Lizy B
Pin It

Tuesday, April 16, 2013

Take-A-Peek Tuesday! Easy Woodgrain Cookie Tutorial!


Did you happen to see those little signs I made for the Easter tushies this year?


Yup, those are the ones. 

At the time I didn't really think of them as woodgrain.  
I was going for a dirty, grubby sort of look, like Mr. MacGregor's garden.

So, when I started getting questions about how to make woodgrain on cookies, I was stumped.

"I don't know how to do that?
How the heck would I even begin to know how to do that?
oooooooh...maybe I did do that. 
Hmmmmm."


They're super easy to do.  Especially if you think of them as 'dirty' instead of 'wood'.

'Cause, how can you mess up something that's just supposed to be dirty?!


I cut rectangles and lightly pressed a skinny wooden stick onto the front before it baked.
To make it look more like a garden stake,  I extended it out the top and made it crooked.
(really, I meant to do that...)

Flood with white or ivory and let it dry.


Gather up all your supplies...


Some clear water or vodka,
plastic paint palette with ivory and brown food coloring,
clean foam brush or sponge,
and a dry paper towel.


Dip the foam brush in water, then the color and smush it around in the middle of the palette.
(looks like I got a little red in there to by mistake)

Try it out on the towel to see if you like the color...


...and wipe it all over the cookie.


Let that dry just a bit, maybe a minute or two.
I liked it a bit drippy and messy...

For the first pass, use just a little bit of color.


For the darker bits, dry your sponge almost all the way, then dip the corner into the color.

Paying special attention to the edges, lightly paint streaks back-and-forth.


Keep adding streaks until its dark enough for you.


Don't forget the edges....


And that's that!

Dirty ole wood signs for your garden...


....or old poison labels for Halloween!


I hope you try it out!

(and show us lots of pictures when you do!)

Thanks for stopping by! Lizy B
Pin It

Monday, October 22, 2012

Easy Halloween Cookie Pops!


I have a few more Halloween cookies to show you before the big day.
These are seriously easy-peasy!
I don't have step-by-step pictures...but you won't need them.


Step 1
Bake round cookies.


Step 2
Flood your cookie in any color you wish!
(white being the easiest since....icing is already white)

Step 3

Pipe a border in a Halloweenish color with a large writing tip.
I used purple and a #4 tip.
*the larger the tip....the easier it is to pipe a round circle instead of a wonky circle*
Immediately sprinkle on some Halloween sprinkles.


Step 4

Stick something in the middle using stiff royal icing.
I had some extra Halloween mini cookies so I used those.
Be sure to use the same color icing as your base cookie.
That way if some oozes out, you won't notice it.
Let this dry all the way.
You could put anything on here.
Little Halloween marshmallows would be cute.
...or candy corn
..or black licorice cats!
(now I want to redo these with licorice)


Step 5

Using piping consistency royal icing, pipe a line of icing for your stick.
Place your stick in....add a little more icing if you need to!
*make sure you stick it on straight.  
Carefully pick up your cookie and check the front before it dries!*


Sweet Sugarbelle
and 
Lisa, The Bearfoot Baker
both have great tutorials for this!


That's it!
All done!
I'm not sure why food is cuter on a stick....

It just is!
Trick or Treat!
Thanks for stopping by! Lizy B

Wednesday, May 9, 2012

Flower Cookie Pops!

I can't think of a single lady who doesn't like flowers!


Teachers love them for teacher appreciation gifts.

Moms and Grandmothers love them for Mother's Day.

Little Ladies love them for birthdays, especially when they turn Sweet Sixteen!


The only thing better than flowers.....


Cookie flowers....on lollipop sticks!!!


You don't have to put these flowers in water....

but they are delicious with a cup of tea!


Thanks for stopping by,

Lizy B

Tuesday, April 17, 2012

Sweet Baby Cookies

Who in the world ever came up

with the ridiculous idea that 

storks deliver babies???


I mean, c'mon......really?

Everyone knows the truth...


Babies come from the cookie garden!

Sheesh!


Thanks for stopping by,

Lizy B


Related Posts Plugin for WordPress, Blogger...