Tuesday, March 26, 2013

Don't forget the Bunnyprints!! (tutorial!)


It's about that time!!!

Don't forget to put baby powder on your 
Easter Shopping list!


Who wants to make 

Easter Bunny footprints?!


Come on, you know you want to!


A few items of business first.

Disclaimer 1
 I did not invent bunny footprints.  
As far as my family is concerned, my fabulous girlfriend, 
Miss Christy, invented them.

Disclaimer 2

This tutorial was shot in super secret stealth mode.
That means the photos are not great....but they'll do.

Disclaimer 3

If you decide to create this little bunny trail, be aware that you 
may need to commit to this as long as your munchkins believe in the Easter Bunny.


Step 1

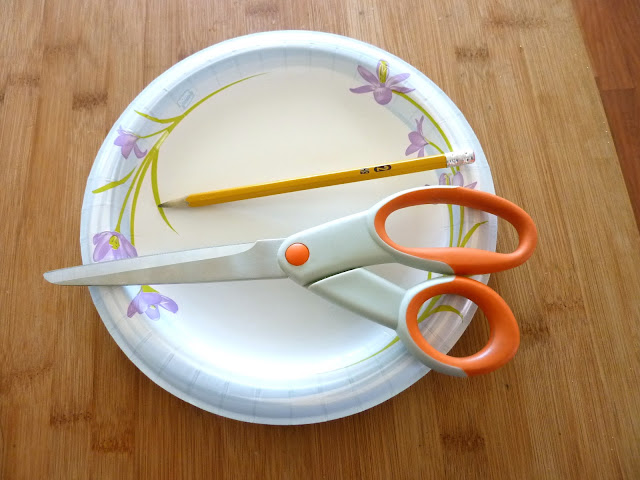
Gather materials.


You will need a paper plate, scissors and a pencil.

(Its a very high-tech craft.)

Normally this project takes place late Saturday night.
Joe hides the eggs, I do the feet.

Because its done at the last minute,
I have no patience whatsoever for gathering materials.

If you are in the mood to pull out your exact-o knife, 
circle cutters or punches,
go for it!


Step 2

Turn your paper plate over and draw some bunny feet.


I have never-ever-EVER used a cookie cutter to draw this.

Today, it was 12 inches away on the drying rack.

I couldn't help myself.


Bunny Feet!


Anybody know how many toes bunnies have?
I have no clue.  This year I made three.

How ever many toes you give your bunny, 
just don't draw them too close together.
I makes them harder to cut out.


Step 3

Cut out the Feet!


One of the comments I received said,
"how did you get your circles so perfect?"

Um....yeah, they're not, and it really doesn't matter.

Stab the tip of your scissors into the center of a toe, twist a few times...
  
and you have a roundish hole!


*Important*

Cut out the toes before the rest of the foot.

I'm sure there is a scientific reason why the paper plate rips
more easily when you cut the big part out first.

I don't know what that is, but I do know it means you have to start over!


There they are!


Step 4

Remember all that baby powder we all bought before we
had our first baby?

And how no one ever got to actually use it because,
 even though its called BABY Powder, 
its really bad for babies?

Now you get to use it!


If you use baby powder, your prints will hang around for awhile.

I like them, so I don't mind.
They make me giggle.

If you would like more temporary prints, powdered sugar works too,
but they wash away quickly.
(especially if you forget to turn off the sprinklers Easter morning)


Step 5

Shake it up!


We have bunnies that come and visit our Salad bar lawn occasionally.

They'll perch themselves on the edge of the concrete and nibble on the grass.

I like to start there.

Set down your plate right-side-up.
(very important)


and...shake shake shake!

I used powdered sugar here because I needed to wash the feet away immediately.

Didn't want to have to explain why the bunny came early!

The rim of the paper plate 
keeps the extra sugar/baby powder from spilling all over.


BUNNY FOOTPRINTS!


Step 6

Think like a bunny!


How does the Easter Bunny come into your yard?

At our house, he crawls under the back fence and hops along the wall.

He takes a little break in the roses for a snack,
then cuts across the grass onto the cement.

Some years, if he's feeling frisky, he hops onto a slide or a tricycle seat!

Silly Bunny!

Eventually he hops over to the backdoor, leaves a basket of treats,
and then hops under the side fence to the neighbors house.


Every year Ethan and Jack can't wait to see where the bunny went.

I hope he hops over to your house next!


Thanks for stopping by! Lizy B
Pin It

Tuesday, March 19, 2013

Take-A-Peek Tuesday! It's Tool Time!


Some people have bouquets of flowers....I have bouquets of spatulas!


Okay, not really.  
Pretty darn close though.

I keep this crock full of spatulas right next to my stand mixer.


Can I show you my favorites?


These two are my manly-man spatulas used for cookie dough.
They're super stiff and strong.  

When my dough is finished mixing, I scrape it into a ball with one of these, 
then use the sharp edge to cut it in half for rolling.

 It's sort of like a curved bench scraper with a handle.

Here's the silly part...they came with my food processor.
I've never actually used them with my food processor....
but I love them.


Here's something else I use all the time.

It's a little baby whisk!


Isn't it cute!!!

Perfect for whisking up meringue powder and water before it goes into royal icing!!!


It even has a little baby price.


You can't beat that!!!


I saved the best for last though...


My very favorite, can't-mix-icing-colors-without-them spatulas.


I'm convinced they were created just for mixing icing.

Just look how perfect they are!


No seams, scrapes the bowl perfectly, and the very best part...

the edge is sharp enough to do the 'second' test.

Y'know the test to see if your icing is the perfect consistency for flooding?!

I don't have to get a knife!
Isn't that great!

Love.


Love so much I have 18.

No that's not a typo, I have 18.


But that's okay, know why?


Such a deal!  


Here are some links in case you'd like a spatula of your own...or 18.


Cuisinart Spatula

Baby Whisk at World Market

Spatula at Sur la Table


Thanks for stopping by! Lizy B
Pin It

Sunday, March 17, 2013

Peeps Cookies for Easter!


Here is last year's DIY peeps cookie post.
The cutters I used were in Wal-Mart last year. 
Has anyone seen them this year?
Let me know and I'll post the info here so everyone can find them!!!


Who doesn't love Peeps!!!


Okay...me.  I don't like them.

Please don't hate me...just not a raw marshmallow fan.

However,  give me a s'more made with a peep and I might bite off your finger.


Maybe that's why I've never made these before.  

 I just might be the very last baker to get around to them.


Until recently, peep cutters were hard to come by.  

Now I've heard that Peeps sells them online and

Copper gifts makes a gorgeous copper peep cutter called

the 'Bunny Bun'.  They even have different sizes!

* PIP has them now too!!!*


I've put them into my virtual shopping cart a few times now,

 but they always seem to be the cutters that get left behind when I see my total!!

(copper's not cheap....)


So here we are again, it's Easter time, and I still don't have the right cutter...

(*sigh*)


"NO PEEPS FOR YOU!!!!"


Well we can't have that now can we...?


Time for a little creativity....and pliers.


I found this cookie cutter set at Wal-Mart, in the Easter candy section.

Jack and I were searching for something completely different

 and this jumped off the shelf at me!


I barely had it in my hot little hand when Jack said,

"MooooooooM!  You already have a bunny cutter!"

(some children are much too observant aren't they?)


So I explained to him...


"You know, you're right Jack, I do.  Look at the ears on this bunny though.  

They look a lot like something I need and don't have.  

I think I can turn this into what I need it to be."


.....then...

...after mulling that over for about thirty seconds....


"Mom, can I get that star wars lego set with the clones in it.  

I know I already have it but I can mix up the clones and make new ones.  

I really need it so Ethan and I can have a battle and play together...."


(Little stinker...)


So here's the set that came home with us...


The ears looked just like the ears on a peep to me,

I just needed to get rid of the feet.


I flipped the cutter over 

and just worried about the shape of the edge that would do the cutting.

Its much harder to manipulate the folded/top edge!


It took about five minutes of smushing and pinching 

with a pair of needle-nosed pliers.


No more feet!!!

His cheeks are a little less pointy too.


What do you think?

(they're 4"inches tall, in case you want to make your own!)


Pretty Peepish I'd say!!!


Thanks for stopping by! Lizy B
Pin It

Tuesday, March 12, 2013

Take-A-Peek Tuesday! Easter Cookie Tutorial!


It's Take-A-Peek Tuesday!

This week I've got a peek at the decorating process for you!

Remember those little teeny tiny bunny bottoms?


Wanna make some of your own?

Here you go!

These are quite possibly the easiest cookies ever.

I used:

1. White royal icing, both piping and flood consistency
2. Pink royal icing, 20-second consistency
3. White Sparkling Sugar


Use your favorite sugar cookie recipe
(you can find mine HERE)
and cut out bunny head shaped cookies.  


Any bunny head will do, just make sure it has great ears.


Then....turn it upside-down.


See, the ears are now the feet!


Outline the ears/feet, then the body.
I used a number 3 tip, but use what you're comfortable with.


This is a great example of a cookie that you don't need a tip for.
You could put the icing into a pastry bag or plastic baggy and just snip off the very tip.


Fill the body with flood icing and let that dry at least an hour.


Then fill in the feet with the same icing.

Let this dry for a few hours.


For the pads of the feet and toes I use a squeeze bottle filled with 20 second icing.


The feet are just an oval in the middle and three little dots for toes.

aaaaaaand.....more drying time.

It needs to dry all the way so you don't smudge
 your pretty bunny pedicure with the sugar.


The key to fluffy tails is Sparkling Sugar instead of Sanding Sugar.


See?  Really big....like kosher salt, but sweet.


Use your white piping icing and pipe a half a sphere for the tail 
and immediately cover all the wet icing with sparkling sugar.

Shake off the excess and let them dry!

(these bunnies were up much to late, it was getting dark!)


Little tiny bunny tushies!!

You can make great big ones too if you want...
I won't tell.


Thanks for stopping by! Lizy B
Pin It

Related Posts Plugin for WordPress, Blogger...