


Would you like some pie?


Then....do the same thing all over again.
Make some cherry shaped dots, let dry, repeat until full.


Let those dry!
Now the Crust!!!
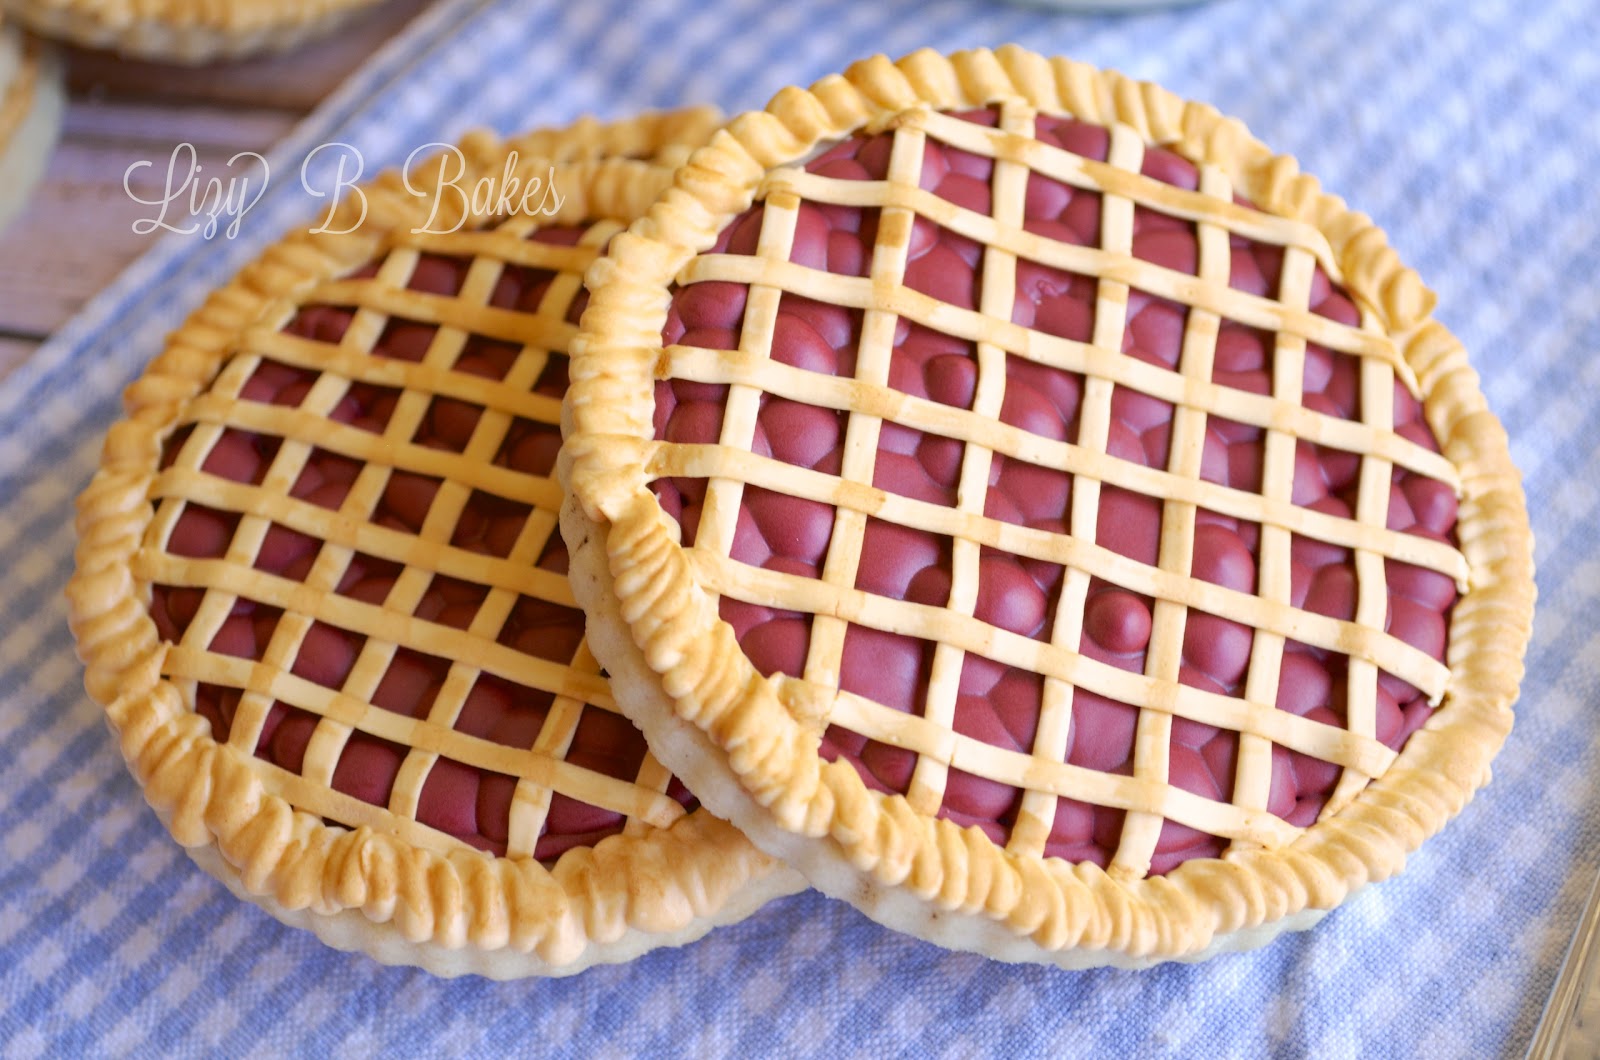
The top and side crust are both made with piping consistency ivory icing.

I used a 301 tip for the lattice strips.

Its a small flat tip, kind of like a basket weave without the grooves.
I've seen it called a 'calligraphy' tip, but I've never actually tried it for writing.
First one direction...

....then the other.

Easy-peasy.
I liked that the lines are all bumpy like a real pie!
Now, how you feel the edges of a pie should look really depends on your family.
Some people just fold it over on itself, others make a little ruffle.
My grandmother used a fork to crimp the edges of her pies,
so that's what I wanted to re-create.

This is a 101s petal tip.

I held the cookie in one hand and made a smooshed ruffle,
making sure that the crust met the filling.
Then set it down veeeeeeerrrrrrrry carefully.
Let it dry really well.
Overnight would be best.

Look....it's a pie!!!
But....hmmmm.
It still looks a bit....raw.
When my grandmother baked a pie it was all shiny and golden.
They never looked pale like this!
Nothing a little painting can't fix!
I can never remember if she used milk or an egg-wash,
so I used Vodka!!!!
(heh-heh)
Mix a bit of vodka (or water, or vanilla extract) with a bit of warm brown food coloring...

...and paint it on just like you would before you would bake a pie.
No need to be careful.
Just get your brush wet and brush over all the crust!

That's better!!!!

But now comes the real debate.

Do you prefer whipped cream or ice cream on your pie?

Or both?!


Adorable, I need to give these a try before the end of summer. Thank you so much for the awesome tutorial :)
ReplyDeleteThese are adorable! I just pinned them! My son is a cherry pie-aholic. He would love these!
ReplyDeleteHappy Baking!
Terry
Absolutely so adorable! Love them!
ReplyDeleteWhat an incredible work ! Congrats, they are wonderful.
ReplyDeleteSimply fantastic! You really make it look soooo simple, but I'm a firm believer that mine would NOT look like yours! That's just fine though, cuz I love just staring at yours!! Beautiful!!
ReplyDeleteJeannine @ The Concrete Cottage
Amazing Liz! They are beautiful and the painting makes them look real!!
ReplyDeleteAbsolutely darling, Liz! You make it looks so easy :)
ReplyDeleteI LOVE these little pies!
ReplyDeleteOh my gosh! These are so cute!
ReplyDeleteSo cleaver! Looks sooo yummy!
ReplyDeleteI love these so much! The painting is the perfect finishing touch!
ReplyDeleteoh my gosh OMG that's alli
ReplyDeletekept saying as i scrolled down.
you really should be on TV
and this one belongs in a magazine.
carol perks
so cute!!
ReplyDeleteLove these, Elizabeth!! There's so much dimension on one cookie! I just picked up a 301 tip from a Wilton writing set, too. I can't wait to give it a try.
ReplyDeleteWow. I am in awe! How did you DO that?! Not sure I could pull it off! It would look like one of those Pinterest fails if I did, lol! What a darling idea, thanks for sharing! I love it!
ReplyDelete~Jen @ YummyHealthyEasy.com
I love this idea! Now I need to save my pennies to buy cake decorating tips to try this out! Thank you for sharing. :)
ReplyDeleteThese are the cutest cookies I've ever seen. What a labor of love...almost too pretty to eat.
ReplyDeleteThese are adorable and such a creative take on cookies. Pinning and sharing on FB and a twitter. Thanks for sharing at Marvelous Mondays!
ReplyDeleteOk those are just too freaking cute!
ReplyDeleteWow- these are precious! You are so creative, it wouldn't have occurred to me to make pie on top of cookies. Wouldn't these be a sweet favor to give at an event (wedding or other) where the main desserts were pies? Love this!
ReplyDeleteSeriously, so adorable. I never would have thought to do this!
ReplyDeletehi Lizy
ReplyDeleteThese look way to good. What a creative idea. I've gotta give this a try. Thanks also for sharing at our Thursday Favorite Things Blog Hop today. It is wonderful to have you join us. I'm also your newest follower via GFC and Bloglovin. I've enjoyed visiting you.
Angel @ sewcraftyangel.blogspot.com
This comment has been removed by the author.
ReplyDeleteSo cute! This would be great on a larger scale too, as a cookie cake put into a pie plate.
ReplyDeleteThese are awesome!
ReplyDeleteyou rock my cookie world my friend. Love these! Thank you for sharing at the Thursday Favorite Things hop. I featured you on facebook xo
ReplyDeleteHello! Just stopping back by to let you know that I will be featuring these at tomorrow's Marvelous Mondays party. Have a great evening!
ReplyDeleteJulie @ This Gal Cooks
Amazing! I'm blown away by how cute these cookies are! : )
ReplyDeleteThese are super cute! Never seen anything like them. You are really talented!
ReplyDeleteStopping by from The Crafty Blog Stalker Link Party
~Tenns @ New Mama Diaries
Wow! Those are amazing! You are really talented, great tutorial too!
ReplyDeleteTia from http://www.TheCraftyEngineerx.etsy.com
Wow this is such a cool and amazing idea! I've never had pie but this is definitely one I'd eat!
ReplyDeleteohhayblogs.blogspot.co.uk/
Lizy, These are so beautifully done! What a creative way to use a simple round cutter.
ReplyDelete